Tajima DG/ML by Pulse Changes in version 14.1.1.5367
Here is a full review that outlines the major changes in Tajima Pulse by Maestro version 14.1.1.5367 machine embroidery software for digitizing . Download here You will need your Pulse community and forum user name and password to access this digitizing software free download. If you do not have a user name and password for the community, you can register.
Quick Name Express
This is an option to Tajima DG/ML by Pulse machine embroidery software that automatically creates the machine embroidery designs once the text is entered. You can immediately print a worksheet that contains the bar codes of the designs prepared and automatically pull the embroidery design from the computer to the machine using the barcode.
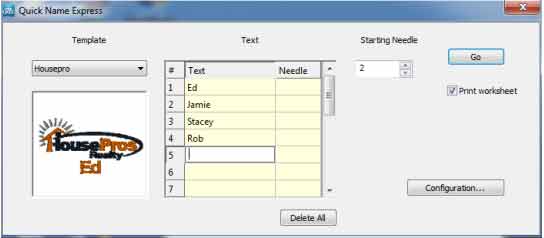
The machine will sew the text in the color of the needle number specified. What's more, you can set up your designs to automatically configure needle assignments. Just scan the barcode, and start sewing. This is a great option for customers producing multiple personalizations for teams or businesses. Quick Name Express is an option to Composer and higher. Create template PXF files from within DG/ML and use them in the Quick Name Express application.
Embroidery Font Categories
You can now group your fonts into categories. Font Categories enables you to organize your machine embroidery fonts and to quickly find the fonts you need for a specific job. You can create and edit font categories by selecting Tools - Manage - Font Categories from with Tajima DG/ML by Pulse. To create a new category, click the New button.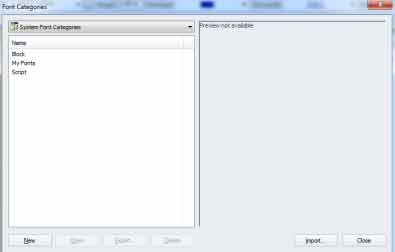
Once you create a new Font Category, you will be presented with a list of fonts that belong to the selected category and a list of the remaining available embroidery fonts. To add predigitizied fonts to the new category click the left arrow button on the center of the Font Category program screen. You can remove selected fembroidery onts from a category by clicking the right arrow in the center of the Font Category screen.
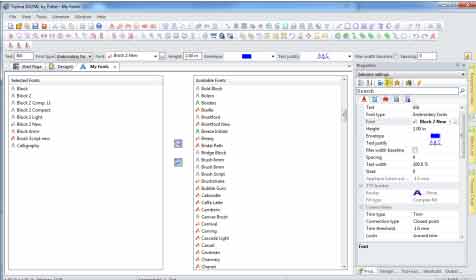 You can save your changes by selecting File - Save. If you have created a new Font Category, you will see a dialog enabling you to name the new category. After Font Categories are created, you can use them by clicking the … button next to the embroidery font name (your choice). This will display a dialog with a list of Font Categories and the fonts associated with each category.
Layered Fonts
For those digitizers and designers who have the ability to create their own embroidery fonts using the Font Creator or TTF Converter options, there is a new font type called Layered. Layered embroidery fonts have a unique sewing order that you can control using the Elements function in DG/ML. DG/ML will sequence all of the letters in a line of text based on information provided in the Elements of the embroidery letters. When creating your font, use the Elements function to tag different segments or blocks with a layer. When the text is used, all of Layer 1 will be sewn first in the line of text, then all of layer 2 and so on. This is especially useful for creating an applique font where you would like all of the marker embroidery stitches to be sewn first.
In this example you would create a new Element named Layer:1 and add all of the marker stitches to this Element. 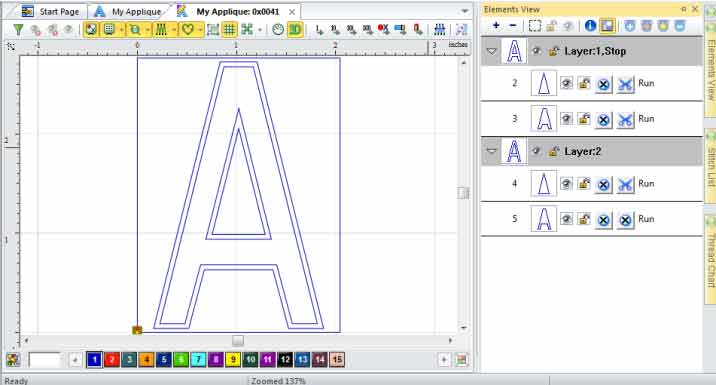 Next, create a new Element named Layer:2 and add all of the tack down stitches to this Element. Create each individual embroidery letter of the font using the Element:1 for marker stitches and Element:2 for tack down stitches.
When you use the embroidery font, all of the Layer 1 stitches will be sewn first followed by the stitches that are in Layer 2 of each letter.
Layered fonts also have the ability to add a stop and frame out command at the end of a line of text. To add a stop after all of the marker stitches in our previous example, change the name of the Element named Layer:1 to Layer:1,Stop. If you name the elements in all of the letters in your font in this way, the software will sew all of the marker stitches in Layer 1 followed by a frame out and stop. The tack down stitches will be sewn after the stop command. The frame out distance can be set in the properties of the text segment. Remember to set the Font Type to Layered in the Font Properties dialog.
Font Icons
The icons next to the font names have been updated for embroidery fonts to better indicate the font type. A description of each icon is listed below:
![]() - This icon indicates that the embroidery font is a Pulse font and contains outlines that can be used as borders.
- This icon indicates that the embroidery font is a Pulse font and contains outlines that can be used as borders.
![]() - This icon indicates that the machine embroidery font is a Pulse font and does not contain outline borders.
- This icon indicates that the machine embroidery font is a Pulse font and does not contain outline borders.
![]() - This icon indicates that the font contains outline borders and is usually created by companies other than Pulse.
- This icon indicates that the font contains outline borders and is usually created by companies other than Pulse.
![]() -This icon indicates that the font does not contain outline borders and is usually created by a company other than Pulse.
-This icon indicates that the font does not contain outline borders and is usually created by a company other than Pulse.
![]() - This icon indicates a classic style font. Classic style fonts have limitations in how stitches are calculated when sewing from right to left and center out and do not use branching.
- This icon indicates a classic style font. Classic style fonts have limitations in how stitches are calculated when sewing from right to left and center out and do not use branching.
Stability
A problem has been addressed that may have caused the software to become unresponsive during creating a new file or opening a file with the grid turned on.
Quotation Estimator Wizard
Improvements have been made in the 3D renderings using the Quotation Estimator Wizard. Additional customer contact and thread color information can now be displayed on the Quotation Worksheet
Lochrose
A new optional component for Tajima embroidery machines attaches Swarovski crystals to garments. The Lochrose option in Tajima DG/ML by Pulse creates designs for use with these devices. The functionality of the Lochrose tools are similar to Sequin.
User Interface
A problem has been corrected with the grid to address an alignment problem when changing the origin of the grid. The segment properties dialog has been rearranged to avoid the dialog being cutoff in some resolutions. The Insert Mode can now be enabled or disabled while using digitizing tools. This version now ensures that stitches will be regenerated when clicking OK after making changes to settings in the segment properties window. Changing a setting in an edit box from the segment properties window will now activate the Apply button. Improvements have been made to enable you to more easily select and move a segment that contains only a horizontal or vertical line. You can now access Presets from the Convert Segment To menu item. A problem where moving a color in sequence view would expand the segments in the list has been corrected.
![]() An icon is now available for the Show Active Group function. This will toggle display of only the selected segments or all segments in a machine embroidery design.
An icon is now available for the Show Active Group function. This will toggle display of only the selected segments or all segments in a machine embroidery design.
Import Artwork
Slicing a segment will now retain the color of the artwork. Importing an AI or EPS file will now show a preview of the image.
Contour Underlay
In order to maintain proper stitching quality, contour underlay stitching should be at an opposing angle to the top stitching. Depending on shape there may be times where the contour stitching is parallel to the top stitching. To resolve this, we have added some new settings for contour underlay on complex fill segments. These settings appear in the contour underlay section of segment properties when complex fill settings are used. You will find them under the heading Add Triangle Run:
Enable – When Triangle Run is enabled, the contour stitching will be calculated to ensure that they will not be parallel with the top stitching.
Angle Tolerance – Angle Tolerance is used to determine when the triangle run option needs to be applied. A triangle run will be applied if the angle between the top stitching an the contour underlay is less than the Angle Tolerance.
Minimum Distance – This setting is the minimum distance of a line to apply the triangle run.
Triangle Height – The Triangle Height setting defines the height of the triangle for the triangle run contour stitching.
Design Spooler / Networking
Performance improvements have been made when sending designs using the TBF Bi-Directional Format to serial based machines. Performance improvements have been made for customers using the Barcode from Librarian option.
Stitch to Outline Conversion
A number of improvements have been made to recognizing fill patterns during Stitch to Outline Conversion. You now have the ability to perform Stitch to Outline conversion on a selective group of stitches. Once stitches are selected in stitch edit mode, right click and select the option STO Group. Stitch Generation Improvements have been made in the generation of parallel underlay.
Comments
We accept payments

![]() Instant download
Instant download ![]() Tested design
Tested design
![]() Any formats
Any formats![]() No VAT and FEE
No VAT and FEE
New embroidery projects
New free embroidery
available only for customers
Latest logotypes
sport, auto, food, drink, car, fashion, colleges, entertainment, social, market, business
Embroidery Trend
Add new proposal or trend
Last review
Embroidery, equipment, software and trend news.
Last photos
All photos in Gallery


 Embroidered women's jacket
 Ballet embroidery dress
 Owl embroidered cushion