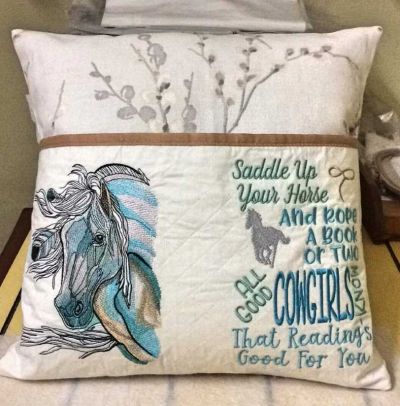
Cushion with horse embroidery design
Sofa cushion decorated with machine embroidery.
The dense fabric is soft and warm, well-shaped and perfectly suited for embroidery. You can bring a little coziness into the house with a comfortable sofa cushion. Combining different colors of fabric, monochrome and with a pattern, you can choose any color suitable for your interior. This pillow is made with a pocket, in which you can put the remote from the TV while watching a romantic film. From the master class you will learn how to make embroidery and sew a pillow.
Cushion. Materials:
Dreamy sad horse machine embroidery design
Disappearing marker for tissues
Temporary fixation adhesive spray
Pillow-base with a size of 40x0 cm
2 meters of decorative ribbon with folds
A piece of fleece fabric with a pattern, 45 cm long
Tear-off stabilizer for machine embroidery
Cushion. Machine embroidery:
Start work with embroidery on the pillow pocket. Cut out a square with a size of 45 x 45 cm from a monophonic material. Using a vanishing marker for the fabric. Mark the center of the part by folding it in half. Print out a paper template of the chosen machine embroidery design. Place the template on the front side of the fabric, placing its bottom at a distance of 1.5 cm from the bottom edge of the fabric.
Insert the non-adhesive stabilizer in the embroidery frame. Apply a layer of glue-spray to the stabilizer and glue the fabric on it, combining the marking on the fabric with the centers in the embroidery frame. Place the embroidery frame in the machine and load the design. If necessary, change the position of the design using the buttons to move the pattern. If the design position is correct, the intersection of the center lines should coincide with the needle.
Embroider the design and, at the end of the embroidery, tear off or cut the stabilizer close to the contours of the machine embroidery design. Fold the fabric in half, so that the embroidery is on the front side of the part. Straighten the side and bottom edges of the part 6 mm from the edge.
To prepare the front of the pillow, cut out a square of cloth with a pattern. Fold the cut out square, measuring 43 x 43 cm, with a pocket. Fold the details so that the embroidered motif is pointed upwards.
To prepare the back of the pillow, cut out two rectangles of fabric, 30.5x43 cm in size. Turn the allowance 2 cm wide, one long edge on each of the rectangles. Reinforce the allowance for the same width and iron. Lay a stitch at a distance of 0.6 cm on the inside of the tucked edge.
Fold the rectangles together, making the overlap width of 8 cm. Grind or sew parts in the overlapping area. Round the corners of the part.
It remains to add finishing. On the perimeter of the back of the pillow, place a decorative strip with folds, directing the folds to the center of the part. Pin the part with pins or fix it with a stitch. In the corners, cut the decorative part so that it gently lies in the corners.
On top of the back of the pillow, put, face down, a pillow detail with a pocket. Align the edges and stitch along the edge to the width of the allowance. Do not sweep the edges. Turn out the resulting pillowcase and put the pillow inside.
Comments
New free embroidery designs
available only for customers via our Reward Points program
Last photos
All photos with our embroidery designs in Gallery
Look at a huge number of beautiful and successful real projects with our work. You can us tags for search.