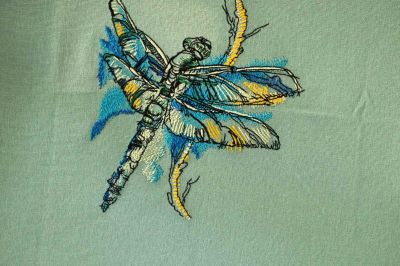
Kitchen napkin with dragonfly design
We’ll embroider a test piece in a sketch style. I used my Happy 7-head embroidery machine. Haven't run it for quite a while. Last time when I used it began to make loops. No obvious reasons. I changed neither threads nor fabric. Loops tended to be large is some places. I checked up the shuttle, the upper and lower thread tension.

All fine.
The loops weren’t everywhere, only at certain angles and on certain stitches. The tests showed that the trouble persisted at 35–50 degrees, satin stitch. I contacted the Customer service in Montevideo. The service workers (as usual) talked to me at length about the quality of my design (one should know how to make them, where on Earth did you get a design like that and so on). I suggested that they stitched a couple of lines themselves. They neither contradicted me nor did anything else, I’m afraid. By the way, I’m not the only one with this problem; it was described at the English-speaking embroidery equipment forums. In the end, I decided that I myself would check up the bobbin case for scratches and change the needle. Leaping ahead, I’ll say that after I've changed the needle, the number of loops went down significantly, but some troubles remained. It makes me think that the problem is with the machine itself. In order to do the test, we chose our Dragonfly on bush branch embroidery design. It appeared in our shop about a month ago, and no one has sent us a photo of the embroidery yet. So, I decided to see how it looks on an item. Our series of water-color animals is rather lightweight (meaning low stitch density). There is no base layer. Thus, we reduce the stitch count and the machine running time, and also avoid fabric distortion. We save the stabilizer, too. The design consists of stitch columns of varying colors and shapes with 60–70% of the standard density. Apply the Florentine effect and different gradients (from denser filling to more sparse one and vice versa). This will help to imitate a watercolor image. In the end, finish the embroidery with black threads (you can use any other contrasting color) in order to have a crisp outline. The outline should imitate the sketch style: a ragged edge, details in the variety of shapes and styles. This will give the design the final polishing.
As a base, we used a napkin purchased in Sodimac (a big household store in Uruguay). It is made of cotton with a high amount of synthetic fibers. During the embroidery, this fabric behaves similarly to denim. It is resistant to distortion and puckering. Costs about 1 dollar a piece. For a stabilizer, we found pieces of fusible interfacing, overlapped them and framed the whole thing into the 320 x320 mm frame (a round 180 mm hoop proved to be too small, and a 210 one I don't own). For that matter, I can say that we could have spared stabilizer altogether.
The beauty of this embroidery technique is that small and even big distortions do not damage the final look. Any displaced element can be regarded as a special effect. Therefore, in case you want to embroider a design on a thin T-shirt, but are afraid that the fabric will pucker and the contours and fills will shift, don’t hesitate to use this style. We have an entire collection of such designs.
This is what we got in the end. The embroidery while still in the hoop.
Comments
Last photos
All photos with our embroidery designs in Gallery
Look at a huge number of beautiful and successful real projects with our work. You can us tags for search.